So you've decided that you wanted to delve into the area of ripping backgrounds, have you? Odds are that if you're reading this, you'd like to learn how to do this. If you have experience ripping sprites, then you probably already know how to do this. Don't worry if you don't, because knowing how to rip backgrounds will also teach you how to rip sprites. Let's dive into this exciting area, shall we?
Note: Technically, you won't be "ripping" the backgrounds. You'll instead be "capturing" them. The two are different things, but the term "rip" is often used in place of "capture". I'll use the term as well in this tutorial, but I just wanted to state that the two processes are two different things.
One of the neat things about ripping is that there isn't much that you require to do so. All you need is the source ROM you want to rip from, an emulator that supports layers, and dedication. Now, you can rip sprites or backgrounds using an emulator that doesn't support layers, but that requires a lot more effort. Why make it harder on yourself when you can just use an emulator that supports layers?
For this demonstration, I'll be using ZSNES Windows 1.42, which can be (or a newer version) obtained from their website. I'll also be using a Megaman X3 ROM. Since copies of games that you don't have a license to are illegal, I won't be providing you with a link as to where to obtain a copy - you're on your own. Please note that the techniques used in this tutorial will work with just about any ROM.
Note: Bear in mind that newer systems such as the Playstation and Gamecube don't have "layers", nor do they have "sprites". "Sprites" that you see on these newer systems are actually flat polygons - not 2D sprites. Because of this, ripping from these systems must currently be done by hand. The process in this tutorial will only work on the older systems such as the SNES and Sega Genesis.
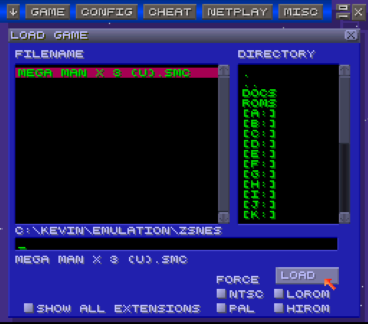
Boot up your emulator and load the ROM. In ZSNES, this can be done by selecting Game -> Load in the main menu. From here, navigate to the folder where the ROM is located, select it, and press the button labeled 'Load'.

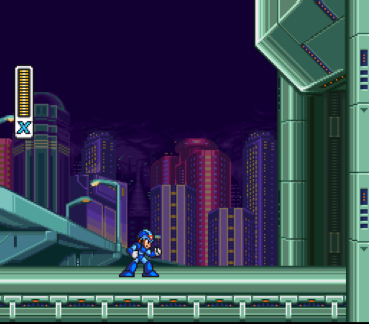
Once you press the 'Load' button, the window will close, and the emulator will start running the game. From this point, you can actually play it using the controls that are set in the Config -> Input #1 menu. Skip past the introduction and start a new game. After the introduction sequence, you'll be in control of X.

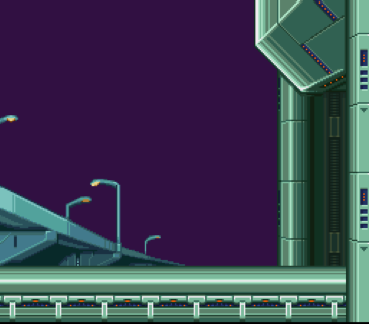
Now, games on systems like the SNES use "layers" to display objects. For example, the city scape that you see behind X, the road he's standing on, and X himself are actually on different layers. Don't believe me? Go ahead, remove a layer, and see for yourself. To do this, you can use the ZSNES defaults, the keys 1 - 5 (not on the number pad). '1' toggles layer one on and off, '2' toggles layer two on and off, etc. '5' toggles the "object" layer, also called the "sprite" layer. Press '2' and '5', removing both the layer the city scape is on and X to see this in action.

The separation of graphical objects is done for many reasons, but the main one is that it makes the job much easier for the game's developers. How much work do you think it would be for a developer to make an image for every possible character pose at every possible location? For this reason, objects are separated into different layers to make this task easier.
Instead of the predefined moving images that you see on television and in movies, video games separate the background and the objects in the foreground. The moving objects can then move and jump around without having to redraw the background every single time. This is very similar to how cartoons are made. The background is drawn first, and then the characters which are drawn on a transparent overlay are laid on top of it.
By now you've probably figured out how to get rid of all the clutter from the screen, exposing the background - just remove the sprite / object layer and any layers with overlay displays (health bars, timers, etc.). But how do you take a snapshot of this background and show it to the world? This is where ZSNES's snapshot feature comes in handy. By default, you should be able to press 'spacebar' and ZSNES will take a screenshot and save it in the same directory the ROM is located.
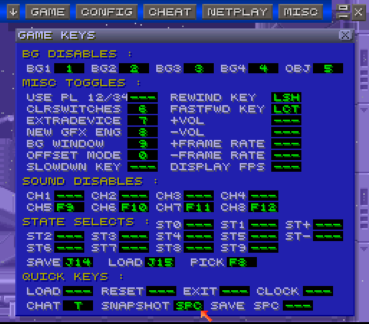
However, this may not always be the case, or you may just want to change the key the snapshot function is bound to. To change this and various other keyboard shortcuts, you can go into the Misc -> Game Keys menu from the ZSNES main GUI. Just click on the key assigned to the function, and press the new key you want the function bound to.

From here, it's just a process of playing through the game, removing the sprite layer along with any overlay layers, and taking a snapshot. This is where the dedication part comes into play, and that isn't something that I can help you with. I hope you found this brief tutorial helpful, and that your efforts in ripping backgrounds go smoothly!
Sometimes you'll be toggling multiple layers quickly, and you might forget which are on and which are off, since you could play through a game and not notice any difference. But there might be objects on that layer which you don't realize and have disabled. To make sure you have all layers enabled, use the 'clrswitches' function (ZSNES default: '6' key). This will enable all layers that you have disabled, along with sound channels as well.
Typically, the foreground is on layer 1, while the background is on layer 2. Overlay, such as life gauges and timers, are on layer 3. Also on layer 3 are usually objects meant to move but not be sprites. These are things like fog, rain, snow, falling leaves, speeding clouds, etc. Always be aware of these objects, because you can accidently disable them on one level, not realize it, and move onto the next level where such objects are used.
You can also take snapshots by using the menu that pops up when you press the F1 key. This will freeze the game and bring up a menu with various options. One of these options is a 'Next frame' function. This function will advance the game by just one frame and freeze it again. This is very useful when you're ripping sprites, because you can use it to capture every pose in a particular animation. In this menu, you can also change the image format ZSNES saves snapshots in.
ZSNES will only save up to 999 snapshots for a particular game in the same directory. Once you reach that number, ZSNES will save over image 999 each time you use the snapshot function. To avoid overwriting previous snapshots, move them into a different folder when you're getting close to reaching that number.
Written by Kevin Ruble on August 26th, 2006.